
Service instructions for JA-80PB 1 Installation Installation should only be done by a certified technician approved by an authorised distributor. The detector can be mounted flat against the wall or in a corner. Within the detection area of the PIR there should be no objects that can rapidly change temperature...
JA-80PB (0)
Too much choice? Chat or call us at 085-0160316
There are no products in these categories. Shop on.
Service instructions for JA-80PB
1 Installation
Installation should only be done by a certified technician approved by an authorised distributor. The detector can be mounted flat against the wall or in a corner. Within the detection area of the PIR there should be no objects that can rapidly change temperature such as heating, fireplace etc.
Moving objects with a temperature close to that of people such as moving curtains above a heater and pets should also be avoided. Preferably do not place the detectors towards a window, spotlight or moving air such as ventilation outlets, open windows or doors. Dor the sensitivity of air pressure changes and noise, the detector should not be placed near ventilation exits or air conditioners. No source of vibration or audible noise should be present in the protection area. No objects should be in the way of the detector's view. Do not place the detector near metal objects that may interfere with the wireless radio signal. Do not activate the detector if there are still pets or people in the protected area.
1. Open the detector housing by pressing the tab and disconnecting the cable to the front
2. Remove the internal PIR modulevia the internal tab.
3. Make a hole at the screw holes in the rear housing. At least one screw should go through the tamper-sensitive part.
4. Fix the housing to the wall, about 2 metres above the floor (vertically with the tab down).
5. Replace the PIR modulein its original place
6. Do not insert the battery yet and leave the housing open. Follow the manual of the central unit or universal receiver. Basic of teach-in is:
a. Enter teach-in mode by pressing "1"on the control panel when the system is in service mode.
b. Insert the battery in the PIR detector to learn it.
c. Insert the battery into the glass break detector and connect it to the PIR module. The glass break detector will then be taught in the next free address. This means that the glass-break detector is taught in after the PIR.
d. Exit teach-in mode by pressing "#".
To teach-in a detector after the battery has already been inserted, first remove the battery, then press the tamper switch to discharge the detector and prepare it for teach-in. After inserting the battery, give the detector 2 minutes rest to stabilise. The LED then lights up continuously.
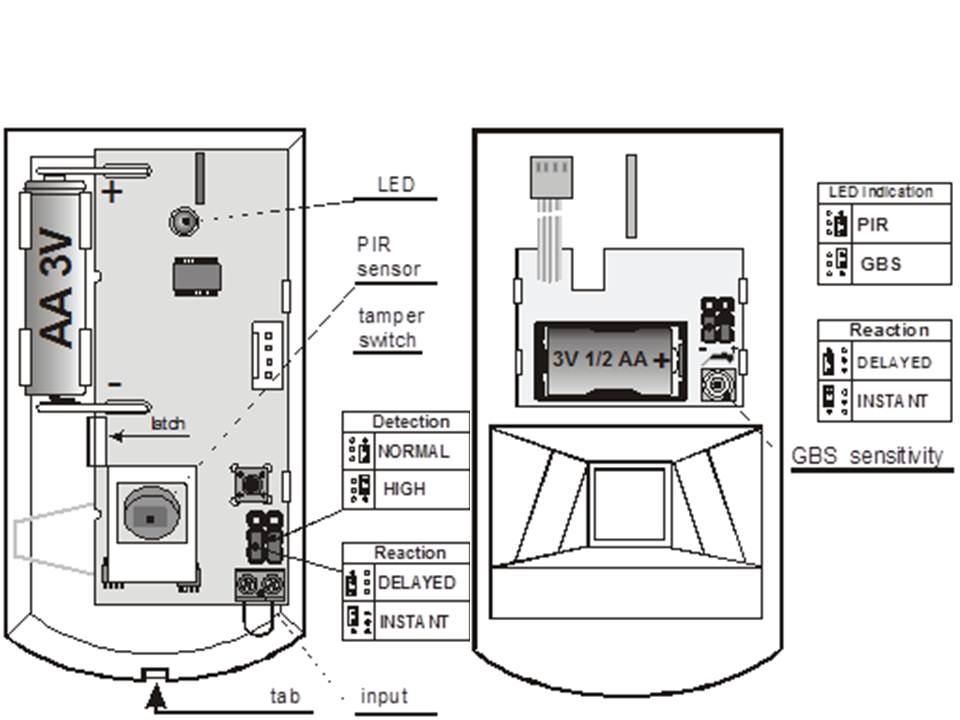
2 PIR module DIP switches
NORM / HIGH : selection forimmunity from false alarms. The NORM position combines good immunity with fast sensor response. The HIGH position has increased immunity and and slower response time. Use this only in problematic areas.
INS / DEL. The DEL position gives and in and output delay for detectors near an input. The INS position gives immediate and alarm after activation of the detector when the system is switched on. This DIP switch only has an effect if in the Oasis control centre the detector is set tonatural response. It also has no effect when used with a UC-8x or UC-8x universal receiver.
3 Glass break module DIP switches
DEL / INS Selects theresponse of the central unit when the detector detects glass breakage. The DEL position gives an input and output delay and is mainly used for detectors placed at an input. The INS position gives an immediate alarm when the system is switched on. This DIP switch only has an effect if in the Oasis control centre the detector is set to natural response . It also has no effect when used with a UC-8x or UC-8x universal receiver.
PIR / BMS: This switch selects whether on PIR or glass-break detector activation the LED lights up. Changing only has an effect during the first 15 minutes after closing the housing (test mode).
Note: Although the two detectors are in one housing, they operate completely independently of each other. Each of the detectors has its own address in the central unit. Each of the detectors can be set independently by means of the DIP switches in the detectors or via the central unit in service mode.
4 Testing the detector
In the 15 minutes after closing the detector, the LED will flash upon activation of the glass break detector or the PIR detector, according to the setting of the PIR/GBS DIP switch. The strength and quality of the signal can be measured by the central unit in Service mode.
With the DIP switch in the position PIR, the LED will blink briefly when the detector is analysing motion. If the LED is on for a longer time, the detector has detected movement and will transmit it to the central unit.
With the DIP switch in the position GBS, the LED will flash if there are air pressure differences , e.g. a gentle knock on the window. If the LED is on for a longer time, the detector has made a glass breakage detection and will be sent to the control centre.
Testing and adjusting glass breakage detector:
- Using appropriate tools or a glove to tap against each window to be protected by the glass breakage detector. The window should visibly vibrate without causing damage.
- The deformation in the glass causes a change in air pressure in the chamber and the LED of the glass break detector should flash. The DIP switch should be in the BMS position.
- Sensitivity to air pressure changes can be set by a potentiometer on the PCB of the glass breakage sensor, which is on the inside of the housing. Turn clockwise to increase sensitivity and vice versa. Avoid too high sensitivity which may shorten battery life.
- The full operation of the glass break detector can be tested using a GBT-212 glass break simulator. After knocking on the glass, the simulator will play the sound of breaking glass to test the conditions of alarm activation.
If there are sound-producing appliances in the room such as air conditioner, heater, fax, refrigerators etc, check if they do not make a sound similar to breaking glass.
5 Detection characteristics of the PIR detector
The standard lens has a viewing angle of 120° and a range of 12 metres. Shown in the image below.

The characteristics can woden changed with the following lenses:
| JS-7904 | Suitable for long corridors, the middle beam has a range of 20 metres |
| JS-7906 | Has only upper beams with a 120° angle and a range of 12 metres. By ignoring the floor, small pets can roam freely |
| JS-7901 | Has only a vertical beam like a virtual wall, which activates the detector when someone walks through it |
Note: After replacing the lens, check that it is working correctly, misplacing the lens may cause poor detection.
6 5 minutes/1 minute PIR detector sleep time
To save battery power, the PIR detector will go into a power-saving mode 15 munutes after the housing is closed. In this mode, the PIR detector continuously watches for movement. If movement is detected, it will be immediately transmitted to the central unit, in the following 5 minutes the detector will ignore all movement . After these 5 minutes, the detector will start watching for movement again until it is activated again. This waiting time can be shortened to 1 minute by pressing the tamper switch when the battery is inserted. By not pressing the tamper switch, the PIR has a sleep time of 5 minutes. This setting has no effect on the glass-break detector which is always ready to detect breaking glass.
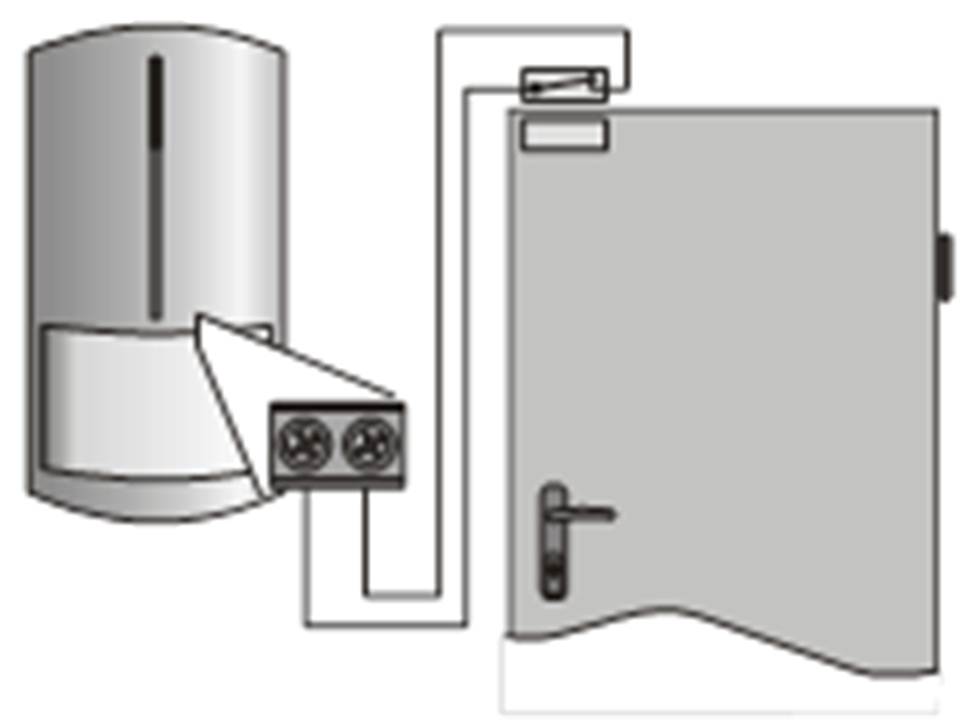
7 External alarm input
There is an alarm input in the detector which can be used to detect, for example, an open door or window. Activating this input has the same effect as the PIR detector. The maximum cable length at this input is 3 metres. Short-circuit the input when the input is not used.
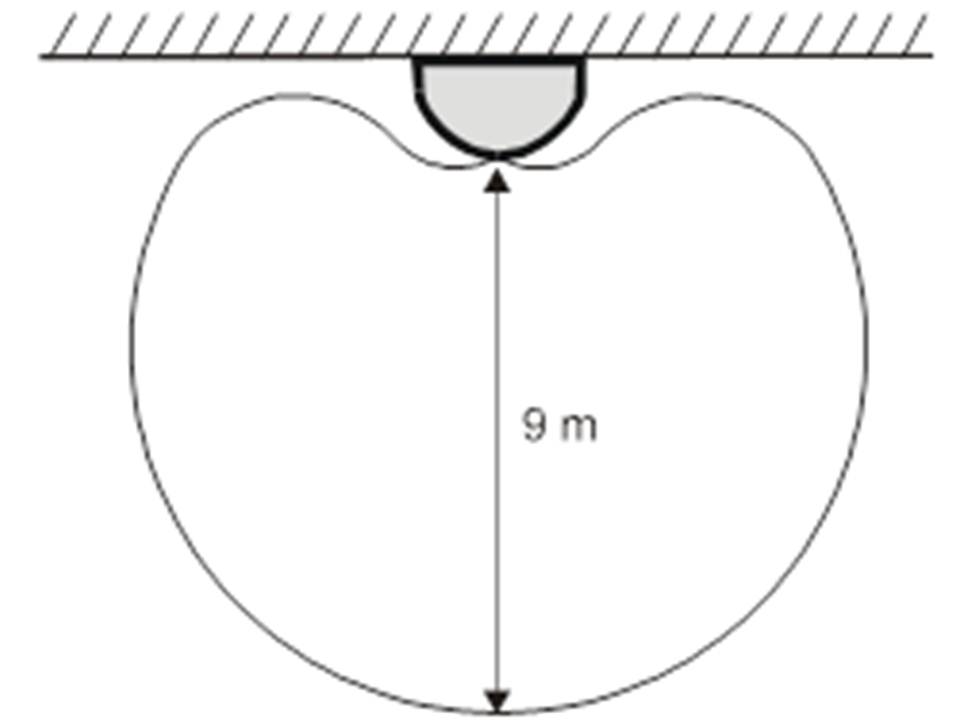
8 Detection characteristics of the glass break detector
The directional response area of the glass breakage detector has a bija spherical appearance. It is possible to detect breaking glass up to 9 metres away as shown in the following diagram. The window must be at least 60 by 60 centimetres in size. For smaller windows, the range of the detector is smaller. Only breaking glass that is part of the walls of the room to be protected can be detected. All types of glass can be detected including laminated glass or glass covered with an unbreakable film. Valuables near windows should preferably be protected by PIR detectors.
9 Replace battery
This detector has 2 internal batteries which are checked regularly. If one of the batteries runs low, the user and/or the installer will be notified. The detector will continue to function and any movement in front of the detector will be indicated by the LED flashing. The battery must then be replaced by a qualified installer in Service mode within 2 weeks.
After replacing the battery, the detector takes about 2 minutes to stabilise, the LED is then permanently on. After replacing the battery, check the operation of bijde detectors. Do not throw away dead batteries, mar follow local rules for disposing of dead batteries.
10 Removing the detector from the system
When a detector is removed, the central unit will indicate this. The 2 addresses of the detector must be released before the detector is actually removed.